
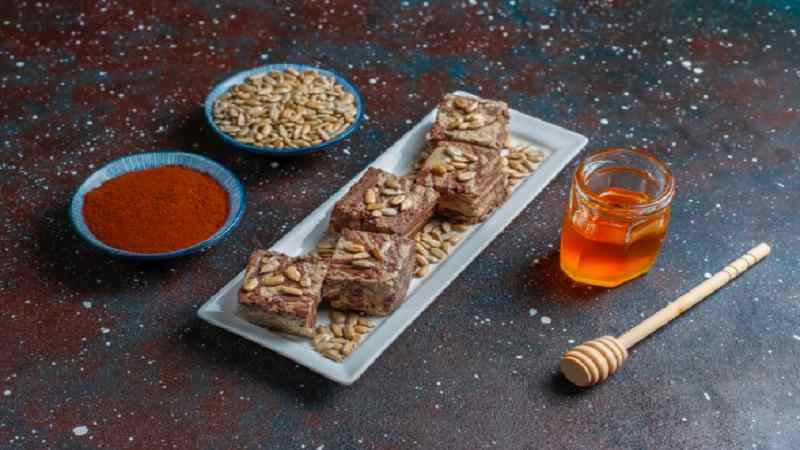
If you’re a fan of sweet and salty desserts, salted caramel butterfinger is a flavor combination that takes indulgence to the next level. Inspired by the classic crunch of the Butterfinger, this upgraded version blends crispy peanut-butter layers with rich salted caramel for a dessert that’s both nostalgic and gourmet.
In this detailed guide, you’ll learn exactly how to make salted caramel butterfinger at home, along with practical tips, variations, and expert techniques to ensure perfect results every time.
What Is Salted Caramel Butterfinger?
Salted caramel butterfinger is a homemade or dessert-style twist on the traditional Butterfinger candy bar. It features:
- Crunchy, flaky peanut butter layers
- Smooth, buttery caramel infused with sea salt
- A chocolate coating (optional but recommended)
The addition of salted caramel enhances the classic flavor by balancing sweetness with a subtle salty kick—making it more refined and addictive.
Why Make Salted Caramel Butterfinger at Home?
Making your own version has several advantages:
1. Better Ingredients
You control the quality—no preservatives or artificial flavors.
2. Customizable Flavor
Adjust sweetness, saltiness, or crunch level to your liking.
3. Cost-Effective
Homemade batches are often cheaper than buying premium candy.
4. Perfect for Sharing
Great for parties, gifts, or dessert platters.
Ingredients You’ll Need
To make a delicious salted caramel butterfinger, gather the following:
For the Crunchy Peanut Base:
- 1 cup creamy peanut butter
- 1 cup granulated sugar
- ½ cup corn syrup
- 1 teaspoon baking soda
For the Salted Caramel:
- 1 cup sugar
- 6 tablespoons butter
- ½ cup heavy cream
- 1 teaspoon sea salt
Optional Chocolate Coating:
- 1½ cups melted chocolate (milk or dark)
Step-by-Step Recipe: Salted Caramel Butterfinger
Follow these practical steps carefully for the best results.
Step 1: Prepare the Peanut Butter Crunch
- In a saucepan, heat sugar and corn syrup over medium heat.
- Stir continuously until it melts and turns golden.
- Remove from heat and quickly stir in peanut butter.
- Add baking soda—this creates the signature airy crunch.
- Spread the mixture onto a lined baking tray.
- Let it cool completely, then break into layers or pieces.
Pro Tip: Work quickly—this mixture hardens fast.
Step 2: Make the Salted Caramel
- Heat the sugar in a pan until it melts into a deep amber color.
- Add butter carefully (it may bubble).
- Slowly pour in heavy cream while stirring.
- Add sea salt and mix well.
- Let it cool slightly until thick but pourable.
Pro Tip: Don’t overcook the caramel, or it may become bitter.
Step 3: Assemble the Salted Caramel Butterfinger
- Layer the peanut crunch pieces in a tray.
- Pour salted caramel evenly over them.
- Let it sit for about 20–30 minutes.
- Cut into bars or bite-sized pieces.
Step 4 (Optional): Add Chocolate Coating
- Dip each piece into melted chocolate.
- Place on parchment paper.
- Allow to set at room temperature or refrigerate.
This step adds a professional touch and enhances flavor.
Expert Tips for Perfect Results
To make your salted caramel butterfinger truly top-quality:
Use a Candy Thermometer
For precise caramel consistency (ideal range: 240–250°F / soft-ball stage).
Choose High-Quality Peanut Butter
Natural peanut butter gives better flavor and texture.
Balance Salt Carefully
Too much salt can overpower the dessert—start small.
Let Layers Set Properly
Rushing this step can lead to a messy texture.
Common Mistakes to Avoid
Even simple recipes can go wrong—watch out for these:
- Burning the sugar: Always cook on medium heat
- Skipping baking soda: This removes the signature crunch
- Adding cream too fast: Can cause caramel to seize
- Overcooling caramel: Makes it hard to spread
Variations You Can Try
One of the best things about salted caramel butterfinger is its versatility.
1. Dark Chocolate Version
Use dark chocolate for a richer, less sweet taste.
2. Nutty Twist
Add crushed peanuts or almonds for extra crunch.
3. Vegan Option
Use plant-based butter and coconut cream.
4. Spicy Caramel
Add a pinch of chili flakes for a unique kick.
Storage and Shelf Life
To keep your salted caramel butterfinger fresh:
- Store in an airtight container
- Keep at room temperature for up to 1 week
- Refrigerate for up to 2 weeks
- Avoid humidity to maintain crunch
Nutritional Overview (Approximate)
Per serving (depending on size):
- Calories: 180–250
- Sugar: High
- Fat: Moderate
- Protein: Low to moderate
This is an indulgent treat—best enjoyed in moderation.
Serving Ideas
Make your dessert stand out with these ideas:
- Serve with vanilla ice cream
- Chop and sprinkle over cakes or brownies
- Gift-wrap for special occasions
- Pair with coffee or hot chocolate
Final Thoughts
Salted caramel butterfinger is more than just a candy—it’s a perfect blend of texture and flavor that satisfies every craving. By following the steps above, you can create a homemade version that rivals even the best store-bought options.
With the right ingredients, proper technique, and a little patience, you’ll end up with a treat that’s crunchy, buttery, sweet, and slightly salty—all in one bite.